The Symfony beginners guide
Symfony might be intimidating at first, that’s why I’m going to cover a few starting points and grow our application from there, this is a Symfony tutorial for beginners so you don’t have to have any knowledge about this framework beforehand. At the end of this blog post, you’ll have a basic understanding of the Symfony Framework.
I will explain how:
- To install Symfony framework
- Render your first page
- Use Twig as a templating engine
- A Symfony Form
- Basic use of Doctrine
If you want a more detailed version about Doctrine, I wrote about it here: Doctrine and Symfony, setup and usage
How to
Install Symfony
Installing Symfony is straight forward, I’m going to be using composer to create a Symfony project.
composer create-project symfony/website-skeleton my-projectThe above command will create a directory called my-project and clone the latest code of the Symfony framework in that directory. This might take a minute or two since all vendors are downloaded during this step.
Depending on your local setup, XAMPP, MAMP, Docker, .. you should now add your website to view it in your browser. Keep in mind though, the Apache root folder should be /public, since the start of the application is initiated there.
If you do not have a local development environment setup, no problem! Symfony has you covered since you can now just start your server straight from the terminal.
bin/console server:startVisit the given host, or if you went the local Symfony server route visit: http://localhost:8000
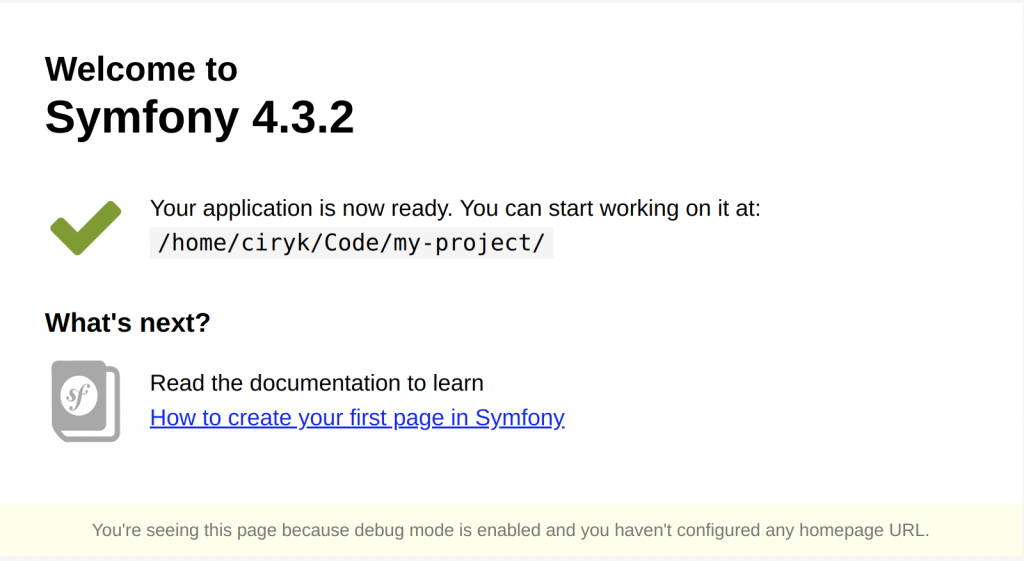
Now before you get started, you might want to add Git to your new project.
Rendering your first page
Now that your installation was a success, let’s get started with creating our first route, controller and template.
Symfony is based on the MVC framework, which in short means that all logic code (PHP) is separated from the visual part (HTML).
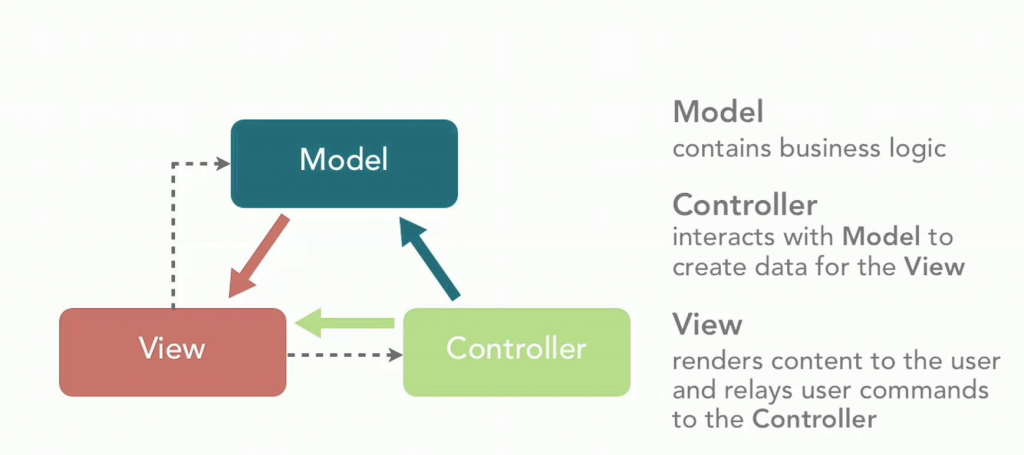
To speed things up a little, we can use the maker bundle developer for Symfony to generate basic code. This bundle needs to be installed first using the following command:
composer require symfony/maker-bundle --devAs shown in the image above, we always start from a controller, which in turn calls the view or the model. So let’s create a controller called HomeController
bin/console make:controller HomeControllerIf you open your project now, you’ll see the make command created a new file HomeController.php in src/Controller/. Let’s take a look now inside that file and split it up, so we can walk through the most important parts.
<?php

namespace App\Controller;

use Symfony\Bundle\FrameworkBundle\Controller\AbstractController;
use Symfony\Component\Routing\Annotation\Route;

class HomeController extends AbstractController
{
    /**
     * @Route("/home", name="home")
     */
    public function index()
    {
        return $this->render('home/index.html.twig', [
            'controller_name' => 'HomeController',
        ]);
    }
}
Above is the full file generated by the maker bundle, take not on the namespace being used and the class name, which is the name we’ve given within the command.
/**
 * @Route("/home", name="home")
 */
Symfony is very annotation based, this is an example of how a route is generated. If you now visit http://localhost:8000/home you will see the controller in action.

Of course, it’s not good practice to not have the homepage as soon as you open the website, so change your path like this:
/**
 * @Route("/", name="home")
 */
Now visit http://localhost:8000 and you will see the same result again, but now on a different URL. Easy, right?
Changing the templates
As your controller suggests, we can find your template at templates/home/index.html.twig.
Symfony uses Twig as default templating engine, a templating engine is a bridge between a backend and frontend-developer and Twig does an excellent job in this.
{% extends 'base.html.twig' %}

{% block title %}Hello HomeController!{% endblock %}

{% block body %}
<style>
    .example-wrapper { margin: 1em auto; max-width: 800px; width: 95%; font: 18px/1.5 sans-serif; }
    .example-wrapper code { background: #F5F5F5; padding: 2px 6px; }
</style>

<div class="example-wrapper">
    <h1>Hello {{ controller_name }}! ✅</h1>

    This friendly message is coming from:
    <ul>
        <li>Your controller at <code><a href="{{ '/home/ciryk/Code/my-project/src/Controller/HomeController.php'|file_link(0) }}">src/Controller/HomeController.php</a></code></li>
        <li>Your template at <code><a href="{{ '/home/ciryk/Code/my-project/templates/home/index.html.twig'|file_link(0) }}">templates/home/index.html.twig</a></code></li>
    </ul>
</div>
{% endblock %}
This is the generated of the template file when using the make command. Let’s strip the code a little to have a better overview of what’s going on.
{% extends 'base.html.twig' %}

{% block title %}Hello HomeController!{% endblock %}

{% block body %}
<div class="example-wrapper">
    <h1>Hello {{ controller_name }}! ✅</h1>
</div>
{% endblock %}
Don’t worry about Twig syntax just yet, it’s really easy and you’ll learn it as you go, it doesn’t get more complicated than this.
Let’s examine the twig file:
Template inheritance
{% extends 'base.html.twig' %}This tells Twig to inherit from the base.html.twig file. Yes really, Twig supports inheritance which makes templating so much more fun.
<!DOCTYPE html>
<html>
    <head>
        <meta charset="UTF-8">
        <title>{% block title %}Welcome!{% endblock %}</title>
        {% block stylesheets %}{% endblock %}
    </head>
    <body>
        {% block body %}{% endblock %}
        {% block javascripts %}{% endblock %}
    </body>
</html>
The contents of the base.html.twig file shown above is really basic, but basically, it’s the core template of your site.
Let’s say you want a hero container on every page, except for the homepage.
<!DOCTYPE html>
<html>
    <head>
        <meta charset="UTF-8">
        <title>{% block title %}Welcome!{% endblock %}</title>
        {% block stylesheets %}{% endblock %}
    </head>
    <body>
        {% block hero %}{% endblock %}
        {% block body %}{% endblock %}
        {% block javascripts %}{% endblock %}
    </body>
</html>
For now, this will be displayed on every page, but remember template inheritance? We can fix this in templates/home/index.html.twig:
{% extends 'base.html.twig' %}

{% block title %}Hello HomeController!{% endblock %}

{% block hero %}{% endblock %}

{% block body %}
<div class="example-wrapper">
    <h1>Hello {{ controller_name }}! ✅</h1>
</div>
{% endblock %}
When setting the block hero empty in the template, it will overwrite its parent template. You can however still call the parent contents by using {{ parent() }} in Twig.
This can be used in both directions, usually, the hero container can be empty and you can choose per page if and what you’ll show in that container.
Pass arguments from the controller to the template
Passing data to the template to display on the website is a common task, and it’s really easy in Symfony!
Did you notice the use of the render function when your controller function was generated?
return $this->render('home/index.html.twig', [
  'controller_name' => 'HomeController',
]);
This calls your template in template/home/index.html.twig and passes one variable called controller_name which in par is used within the template.
<h1>Hello {{ controller_name }}! ✅</h1>As you’ve probably seen, the controller name passed from controller to template is rendered as Hello HomeController.
The same can be done for arrays:
return $this->render('home/index.html.twig', [
   'controller_name' => 'HomeController',
   'values' => ['test1', 'test2', 'test3']
 ]);
And in the template:
{% for value in values %}
  {{ value }} {# prints as test1test2test3 #}
{% endfor %}
Twig include
Another common problem is DRY code, Twig can easily solve this with both template inheritance as described above or with Twig’s include function.
{% for value in values %}
  {% include 'partial/value.html.twig' with {'language': 'en' %}
{% endfor %}
For every value passed from the controller, a partial template value.html.twig will be used to render the value.
<h2 data-lang="{{ language }}">{{ value }}</h2>As you can see, the value variable is passed automatically, you can even pass additional information to the partial template.
This way of working really prevents you from copy-pasting your code and having to refactor a lot of the same things. Start writing DRY code today!
Create a Form
Manually creating and maintaining the HTML of a form is a pain many developers have been hating on for years.
Symfony abstracted this process and you can basically render your form fields dynamically from within PHP. Let me show you:
/**
 * @Route("/home", name="home")
 */
 public function index()
 {
   $form = $this->createFormBuilder()
     ->add('name', TextType::class, [
        'label' => 'Name'
     ])
     ->add('description', TextareaType::class, [
        'label' => 'Description'
     ])
     ->getForm();

   return $this->render('home/index.html.twig', [
     'controller_name' => 'HomeController',
     'form' => $form->createView()
   ]);
}
This is the content of your new controller. Using the createFormBuilder function you create an FormBuilder instance. Using the Formbuilder add methods you can add extra fields to your form.
Notice the specification of the different field types TextType and TextAreaType? That’s right just like plain HTML.
When passing your form to the template you have to create a view for it, and rendering your form in Twig is as simple as:
{% extends 'base.html.twig' %}

{% block title %}Hello HomeController!{% endblock %}

{% block body %}
<div class="example-wrapper">
    <h1>Hello {{ controller_name }}! ✅</h1>

    {{ form_start(form) }}
    {{ form_end(form) }}
</div>
{% endblock %}
Which should result in:
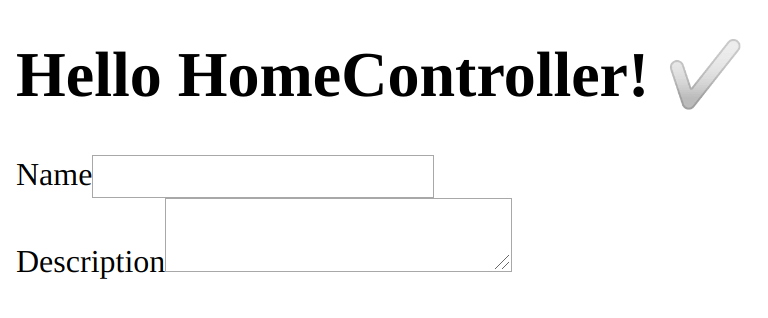
Rendering of a form using Symfony
This works like a champ! But eh, … so much code in my controller and it’s still a relatively simple form, what if I have 20+ fields?!
Using form types
That’s right, we can split up your forms using Form Types, these are reusable PHP files that describe your form fields.
Let’s create one called PostType, a post consists of a title, summary and description.
<?php

namespace App\Form;

use Symfony\Component\Form\AbstractType;
use Symfony\Component\Form\Extension\Core\Type\TextareaType;
use Symfony\Component\Form\Extension\Core\Type\TextType;
use Symfony\Component\Form\FormBuilderInterface;

class PostType extends AbstractType
{
    public function buildForm(FormBuilderInterface $builder, array $options)
    {
        $builder
            ->add('title', TextType::class)
            ->add('summary', TextareaType::class)
            ->add('description', TextareaType::class)
        ;
    }
}
You can generate the above file with the maker bundle. Using bin/console make:form, you can even bind your Doctrine entity, but we won’t do this here.
You now described all of your fields in a separate Form Type file, let’s now rewrite our controller.
<?php

namespace App\Controller;

use App\Form\PostType;
use Symfony\Bundle\FrameworkBundle\Controller\AbstractController;
use Symfony\Component\Routing\Annotation\Route;

class HomeController extends AbstractController
{
    /**
     * @Route("/home", name="home")
     */
    public function index()
    {
        $form = $this->createForm(PostType::class);

        return $this->render('home/index.html.twig', [
            'controller_name' => 'HomeController',
            'form' => $form->createView()
        ]);
    }
}
Yes, I’m not kidding, that’s it! Although our form doesn’t do anything yet, it’s displayed and can now be reused everywhere!
Form submissions
The form created previously is pretty stupid, let’s change that by actually doing something on form submission. The only thing we still need is a submit button.
$builder
  ...
  ->add('submit', SubmitType::class);
You can add the button as described above, or you can simply add it within your twig file like so:
{{ form_start(form) }}
  {{ form_rest(form) }}
  <input type="submit" value="Save">
{{ form_end(form) }}
Ok, now that we have a submit button let’s check for submission inside the controller.
<?php

namespace App\Controller;

use App\Form\PostType;
use Symfony\Bundle\FrameworkBundle\Controller\AbstractController;
use Symfony\Component\HttpFoundation\Request;
use Symfony\Component\Routing\Annotation\Route;

class HomeController extends AbstractController
{
    /**
     * @Route("/home", name="home")
     */
    public function index(Request $request)
    {
        $form = $this->createForm(PostType::class);
        $form->handleRequest($request);

        if (!$form->isSubmitted() || !$form->isValid()) {
          return $this->render('home/index.html.twig', [
            'controller_name' => 'HomeController',
            'form' => $form->createView()
          ]);
        }

        //-- Actual form handling
        $data = $form->getData();

        $title = $data['title'];
        $summary = $data['summary'];
        $description = $data['description'];

        //-- Maybe send an email now?
        print_r($data);
        die();
    }
}
Here we check if the form is submitted and if it’s data is valid, it only then continues to the actual form handling.
The data of the form can be fetched using the getData() function on the form.
You can then perform any action you want with that data, maybe send an email as soon as the post is created? Learn how to send emails with Symfony.
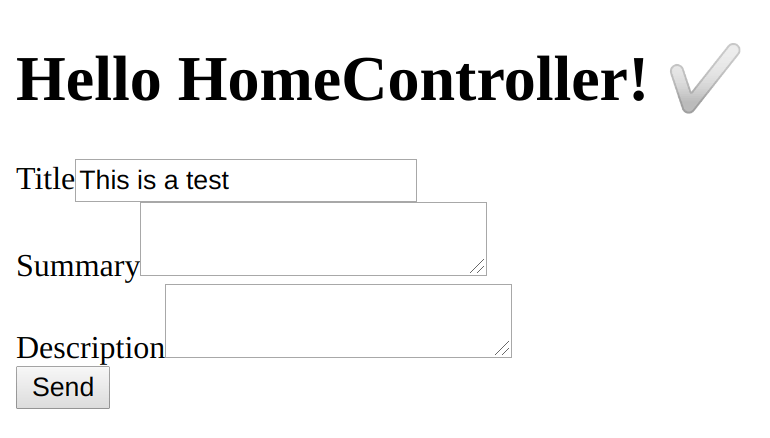
Sometimes it’s needed to pre-fill the form data when the page is loaded, this can be easily done the moment you create the form:
$form = $this->createForm(PostType::class, [
  'title' => 'This is a test'
]);
Now you will see your form title populated with the given data.
Forms are huge in Symfony, but this will help you get started. If you have any questions feel free to comment below!
Your first Doctrine Entity
Doctrine is an abstraction of the link between your PHP code and your database tables.
Let’s create our first Doctrine entity
bin/console make:entityYou’ll be asked a few questions, most of them are really straightforward and you may even get some assistance from the console itself.
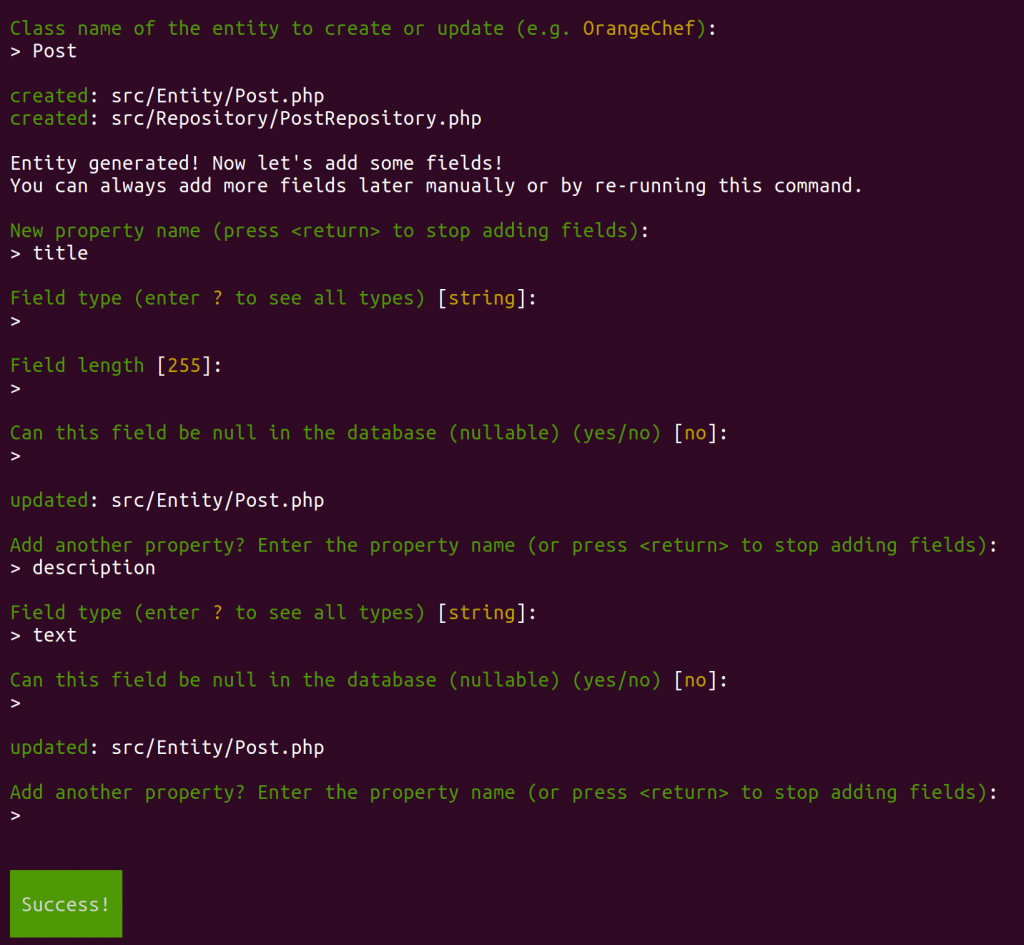
Creation of a Doctrine Post entity
Have a look in your files, there should now be a Post entity file in src/Entity. Inside that PHP file, you’ll find all the fields you entered during the setup commented with ORM annotations.
In this post we won’t talk about the setup of Doctrine or database, we did this earlier at Doctrine and symfony, setup and tutorial. You can do an awful lot with Doctrine and all of it is explained in detail.
Use the entity within your template
This is where Symfony really shines, let me show you using an example:
use App\Entity\Post;
...
$this->render('home/index.html', [
  'posts' => $this->getDoctrine()->getRepository(Post::class)->findAll()
];
In the controller file, I passed the posts argument to the template, for that argument I fetched all possible posts found in the database.
{% for post in posts %}
  <h1>{{ post.title }}</h1>
  <p>{{ post.description }}</p>
{% endfor %}
In the template, you can loop the post’s argument since it’s an array. The post variable now is actually the Post entity, so it makes sense you can use post.getTitle() right? It does, and you can!
But things can even be shorter, post.title prevents you from typing the full function, which is great for readability.
This even works for Doctrine relations, for example to fetch the title of the category without passing it as a variable has never been as easy.
Let’s summarize
Symfony is not an easy framework to get started, but I’ve explained most of the basics in this post, and I hope this beginners guide helped understand the Symfony framework a bit better.
If you have any issues feel free to comment below, I’ll try to help you out.
If you feel like this post has helped you in some way, please comment below with a simple thank you ? !
Symfony framework is too big to explain in a single blog post, so there will be many more to follow so if you’re interested, subscribe to our newsletter or enable notifications using the bell icon.